A Reasonably Fast Python IP Sniffer

Recently my latest project came with a strange requirement – I need to route IP packets from Linux kernel space to user space. In other word, I need to write a IP packets sniffer similar to tcpdump or wireshark.

The project does not have high data rate requirement. So I chose Python for some rapid prototyping to get a feel for the problem.

Sniffing with Scapy … Slowly

My past experience with Python is that it often comes with magical one-liner that just finish my job. And this time, Python did not disappoint me. My co-worker’s Google-Fu quickly found that the Scapy package has a sniff feature, and yes, it is a one-liner. 🙂

from scapy.all import *

def pkt_callback(pkt):
	pkt.show() # debug statement

sniff(iface="eth0",
   prn=pkt_callback, filter="ip", store=0)

On the first try, the above code functioned perfectly and I immediately saw all the incoming and outgoing packets as I browsed through different webpages to trigger http traffic.

So how about some stress test? For that, I browsed to the Ubuntu homepage and downloaded an Ubuntu ISO. The file is large, and the data rate is reasonably high for a quick test. Unfortunately, Scapy didn’t perform so well.

scapy_performance

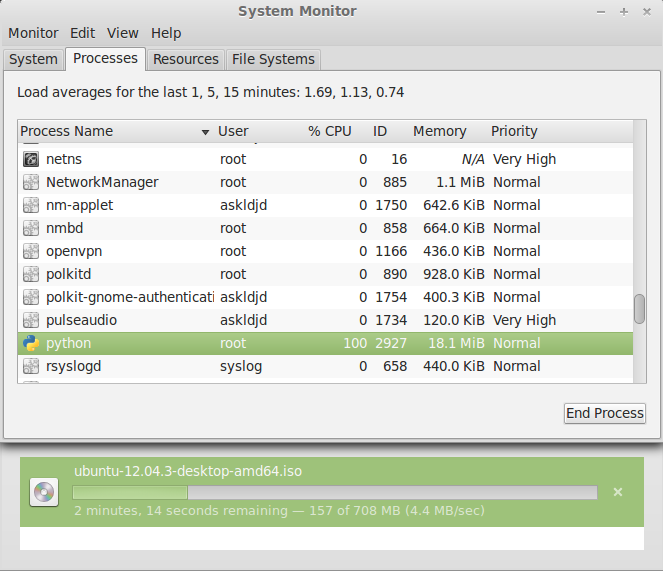
4.4 MBps data rate results in 100% usage.

It turns out that a ~4.4MBps (35Mbps) capture would consume close to 100% of my CPU. This is an unacceptable amount of overhead for just routing packets from kernel into user space.

Sniffing with Raw Socket

Since Scapy comes with too much overhead, the next step was to dive into a lower layer and implement a raw layer 2 socket. In user space, if an application creates a raw socket, the linux kernel will automatically forward a copy of the datagram of the same protocol number to the application. So if a layer 2 socket is implemented, the host application will receive all ethernet frames.

*Layer 2 socket is chosen because I need to sniff both incoming and outgoing packets on a network interface. L3 socket does not appear to provide this capabilities.

import socket, struct, os, array
from scapy.all import ETH_P_ALL
from scapy.all import select
from scapy.all import MTU

class IPSniff:

    def __init__(self, interface_name, on_ip_incoming, on_ip_outgoing):

        self.interface_name = interface_name
        self.on_ip_incoming = on_ip_incoming
        self.on_ip_outgoing = on_ip_outgoing

        # The raw in (listen) socket is a L2 raw socket that listens
        # for all packets going through a specific interface.
        self.ins = socket.socket(
            socket.AF_PACKET, socket.SOCK_RAW, socket.htons(ETH_P_ALL))
        self.ins.setsockopt(socket.SOL_SOCKET, socket.SO_RCVBUF, 2**30)
        self.ins.bind((self.interface_name, ETH_P_ALL))

    def __process_ipframe(self, pkt_type, ip_header, payload):

        # Extract the 20 bytes IP header, ignoring the IP options
        fields = struct.unpack("!BBHHHBBHII", ip_header)

        dummy_hdrlen = fields[0] & 0xf
        iplen = fields[2]

        ip_src = payload[12:16]
        ip_dst = payload[16:20]
        ip_frame = payload[0:iplen]

        if pkt_type == socket.PACKET_OUTGOING:
            if self.on_ip_outgoing is not None:
                self.on_ip_outgoing(ip_src, ip_dst, ip_frame)

        else:
            if self.on_ip_incoming is not None:
                self.on_ip_incoming(ip_src, ip_dst, ip_frame)

    def recv(self):
        while True:

            pkt, sa_ll = self.ins.recvfrom(MTU)

            if type == socket.PACKET_OUTGOING and self.on_ip_outgoing is None:
                continue
            elif self.on_ip_outgoing is None:
                continue

            if len(pkt) <= 0:
                break

            eth_header = struct.unpack("!6s6sH", pkt[0:14])

            dummy_eth_protocol = socket.ntohs(eth_header[2])

            if eth_header[2] != 0x800 :
                continue

            ip_header = pkt[14:34]
            payload = pkt[14:]

            self.__process_ipframe(sa_ll[2], ip_header, payload)

#Example code to use IPSniff
def test_incoming_callback(src, dst, frame):
	#pass
    print("incoming - src=%s, dst=%s, frame len = %d"
        %(socket.inet_ntoa(src), socket.inet_ntoa(dst), len(frame)))

def test_outgoing_callback(src, dst, frame):
	#pass
    print("outgoing - src=%s, dst=%s, frame len = %d"
        %(socket.inet_ntoa(src), socket.inet_ntoa(dst), len(frame)))

ip_sniff = IPSniff('eth3', test_incoming_callback, test_outgoing_callback)
ip_sniff.recv()

So how’s the performance this time around? It turned out to be surprisingly fast.

raw_socket_performance

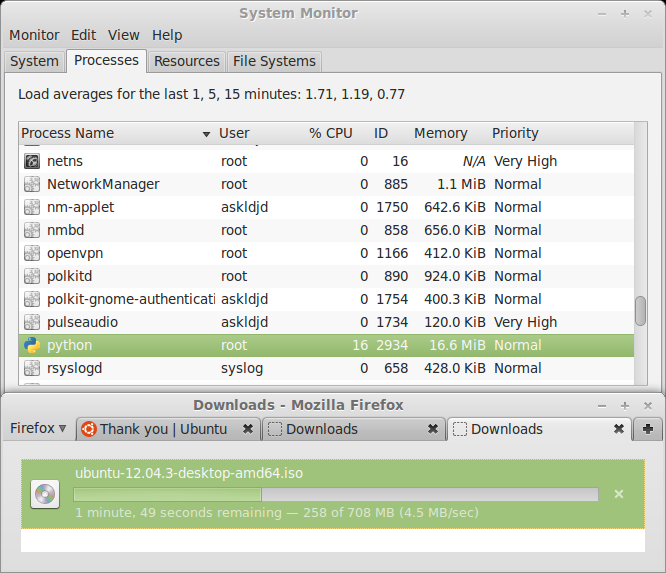
Same as before, but only use 16% of CPU.

With the same data rate, the previous 100% CPU consumption now goes down to only 16%.

This is more than fast enough for my application. Mission Accomplished!

Final Thoughts

If the Python raw socket was still too slow, the next step would be to re-write the raw socket in C.

Scapy comes with a lot of overhead in practice as a live packet sniffer. If you don’t need all the power of Scapy, an IP sniffer can be easily implemented in Python raw socket and provides fairly reasonable performance.

Source

Binding a raw socket requires root permission. Therefore, the scripts need to run under root permission.

scapy_sniff.py – IP sniffer using Scapy

ip_sniff.py – IP sniffer using Python raw socket

Hardware

All tests were run under Mint Linux 15 VirtualBox VM with Window 7 as host.

protoc-gen-docbook – Convert protobuf source into DocBook and PDF

Documentation has always been Protobuf‘s weakest area. Proto source files are expected to be used like an IDL. This works for simple interfaces, but falls apart as the interface increases in complexity with multiple layers of source files.

With the latest update Protobuf from 2.5.0, protobuf compiler is finally preserving the comments within the proto source files in its Descriptor definition. This opens a door to documenting proto files.

protoc-gen-docbook

I spent a week or so writing a protobuf compiler plugin that will convert a proto source file into DocBook and PDF. The plugin is called protoc-gen-docbook, following the protobuf compiler’s plugin naming convention.

The results are very satisfying, and has became a useful tool in my development life. I have open sourced the project on Google Code under the New BSD License.

Here are the shortcut links to the project homepage. It contains much more details on the project.

Project:

http://code.google.com/p/protoc-gen-docbook/

Quick Start:

http://code.google.com/p/protoc-gen-docbook/wiki/QuickStartGuide

Sample Output:

http://code.google.com/p/protoc-gen-docbook/wiki/Samples

Implementation Details:

http://code.google.com/p/protoc-gen-docbook/wiki/DeveloperDetails

As usual, feedback is always welcomed.

SimpleDateFormat is slow

Optimization is often full of surprises. Whether it is low level C or high level Javascript, I always learn something from the profiler. And more often than not, it is the little things that matter.

Java SimpleDateFormat is an powerful time formatter that can handle various date formats in different locales. This power comes at a price. It is slow – very slow.

I learned this last year when working with an Android application. The Android profiler pinpointed SimpleDateFormat to the cause of the poor refresh rate. The solution then was to simply adjusting the formatting frequency. By avoiding frequent calls to SimpleDateFormat, performance improved and that was the end of the story.

A year later, now I am working on a NetBeans platform based project and I am facing the same situation again. This time I need to parse several millions timestamp from a log file and convert them to epoch milliseconds. Unlike last year, avoiding the formatter is not an option.

Roll Your Own

The problem is CS-101 simple. I need to parse a timestamp in the format – yyyyMMddHHmmss into epoch time in millisecond. The timestamp is always in GMT.

Here’s the sample code with SimpleDateFormat. This method is called getTimestamp1.

private static final SimpleDateFormat cachedSdf
   = new SimpleDateFormat("yyyyMMddHHmmss");
static {
   cachedSdf.setTimeZone(TimeZone.getTimeZone("GMT"));
}
// Parse date and time into epoch millisecond
public static long getTimestamp1(String date, String time) {

   if (date.isEmpty() == false && time.isEmpty() == false) {
      try {
         return cachedSdf.parse(date + time).getTime();
      } catch (ParseException e) {
      }
   }
   return 0;
}

Alternatively, here’s the do-it-myself version. I call it getTimestamp2.

private static final Calendar CachedCalendar = new GregorianCalendar();
static {
   CachedCalendar.setTimeZone(TimeZone.getTimeZone("GMT"));
   CachedCalendar.clear();
}
public static long getTimestamp2(String date, String time) {

   try {
      int y = Integer.parseInt(date.substring(0, 4));
      int m = Integer.parseInt(date.substring(4, 6));
      --m;
      int d = Integer.parseInt(date.substring(6, 8));
      int h = Integer.parseInt(time.substring(0, 2));
      int mm = Integer.parseInt(time.substring(2, 4));
      int s = Integer.parseInt(time.substring(4, 6));

      CachedCalendar.set(y, m, d, h, mm, s);

      if (CachedCalendar.get(Calendar.YEAR) != y) {
         return 0;
      }
      if (CachedCalendar.get(Calendar.MONTH) != m) {
         return 0;
      }
      if (CachedCalendar.get(Calendar.DATE) != d) {
         return 0;
      }

      if (h < 0 || m > 23) {
         return 0;
      }
      if (mm < 0 || mm > 59) {
         return 0;
      }
      if (s < 0 || s > 59) {
         return 0;
      }
      return CachedCalendar.getTime().getTime();
   } catch (Exception e) {
      return 0;
   }
}

Benchmark

Here are the results using the NetBeans profiler.

The CPU time decreased from 1.13s to 0.288s, which is roughly a ~75% reduction.

CPU time: on getTimestamp1 vs. getTimestamp2

CPU time: getTimestamp1 vs. getTimestamp2

The total object allocations decreased by ~3kBytes (per call).
getTimestampMemory

Final Thoughts

Although simple, the performance improvement here was more significant than any other fancy optimization I’ve done on the application.

getTimestamp2 can be 10-15% faster if you replace Integer.parseInt with another solution.

SimpleDateTime is slow. If you need the performance, it may be worthwhile to roll your own solution.

As always, benchmarking Java is hard. These performance numbers should only be used in relative terms.

Source & Tools

The source code can be found here.

JDK7u15 64 bit, Win7 64bit, NetBeans 7.3.

Protobuf over JNI

On a recent project, I have been working with JNI to wrap up a C++ library into Java. Like most usages of JNI, it is not for performance, but for compatibility.

JNI itself is a beast. It is quite a challenge to get both the performance and the correctness aspects of its APIs right. While its programming style is close to C, exceptions needs to be checked frequently. Its API naming schemes are full of misleading traps that often lead to memory leaks.

It is so complicated that if you want to pass data through JNI, you want to stick with primitive types. That’s because passing complex data structure into JNI is rather painful.

Unfortunately, my project requires passing complex data structures from Java into C++. To solve this problem, I turned to Protobuf for help.

Pojo Over JNI

To get a taste of basic JNI, here’s an example. Say I want to pass the following data structure from Java into C++ through JNI.

// A POJO that we pass from Java into JNI layer.
public class CustomPojo {
   private String s;
   private int i;
   private double d;
   private boolean b;
   private String[] sa;
   private int[] ia;

   public String getS() { return s; }
   public void setS(String s) {this.s = s;}
   public int getI() {return i;}
   public void setI(int i) {this.i = i;}

   ...
}

Since the members within CustomPojo are private, it requires the native side to reach back through individual method calls. Here’s an example of how it would look in C++.

// A set of cached class and method IDs used for optimization.
namespace
{
   jclass customPojoClass;
   jmethodID midGetI;
   jmethodID midGetD;
   jmethodID midIsB;
   jmethodID midGetS;
}
// Cache all the necessary fields for the first time.
void init(JNIEnv *env, jobject customPojoObject)
{
   customPojoClass = env->GetObjectClass(customPojoObject);
   midGetI = env->GetMethodID(customPojoClass, "getI", "()I");
   midGetD = env->GetMethodID(customPojoClass, "getD", "()D");
   midIsB = env->GetMethodID(customPojoClass, "isB", "()Z");
   midGetS = env->GetMethodID(
     customPojoClass, "getS", "()Ljava/lang/String;");
   // This is not productive level code. In practice, rigorous error checking
   // is needed here per JNI best practice.
}

JNIEXPORT void JNICALL Java_com_askldjd_blog_HelloWorld_passCustomArgumentIn(
  JNIEnv *env,
  jobject obj,
  jobject customPojoObject)
{
  if(customPojoClass == NULL) { init(env, customPojoObject); }

  int i =  env->CallIntMethod(customPojoObject, midGetI);
  double d =  env->CallDoubleMethod(customPojoObject, midGetD);
  bool b =  (bool)env->CallBooleanMethod(customPojoObject, midIsB);
  jstring stringObj = (jstring)env->CallObjectMethod(
    customPojoObject, midGetS);
  char const *nativeString = env->GetStringUTFChars(stringObj, 0);
  env->ReleaseStringUTFChars(stringObj, nativeString);
  // This is not productive level code. In practice, rigorous error checking
  // is needed here per JNI best practice.
}

To follow the best performance practice, JNI requires caching the class and method IDs. And to access each fields, we need a seperate JNI call to invoke the individual accessors.

As this point, it should be clear that passing complex data through JNI is non-trivial.

Protobuf over JNI

Alternatively, we can use Protobuf as the JNI messaging medium between Java and C++. This way, the communication channel through JNI is strictly through byte arrays. In this approach, the JNI complexity is reduced to a simple byte array access. Therefore the code verbosity and the potential for programming error is drastically reduced,

Here is the same example as above, but with Protobuf over JNI. First, we redefine CustomPojo into a Protobuf message.

option java_outer_classname = "CustomProtoPojo";
package com.askldjd.blog;
message PojoMessage
{
   required string s = 1;
   required int32 i = 2;
   required double d = 3;
   required bool b = 4;
   repeated string sa = 5;
   repeated int32 ia = 6;
}

Now instead of passing a complicated data structure through the JNI interface, we can encode the Protobuf message into a byte array through JNI, and decode it in C++.

// Interface definition for javah
public class JniPojo{
   static { System.loadLibrary("jni");   }
   public native void passProtoArgumentIn(byte[] byteArray);
}
// Pass a protobuf encoded byte array into JNI layer.
private static void testProtoJNI() {
   JniPojo jniPojo= new JniPojo();
   Builder pb = CustomProtoPojo.PojoMessage.newBuilder()
      .setS("Secret POJO message").setI(i).setD(42.5566)
      .setB(true).addIa(0);
   byte[] ba = pb.build().toByteArray();

   JniPojo.passProtoArgumentIn(ba);
}
// CPP JNI
// Take in a protobuf encoded byte array and decode it into data structure.
JNIEXPORT void JNICALL Java_com_askldjd_blog_HelloWorld_passProtoArgumentIn(
   JNIEnv *env,
   jobject obj,
   jbyteArray buffer)
{
   using namespace com::askldjd::blog;
   PojoMessage pm;
   jbyte *bufferElems = env->GetByteArrayElements(buffer, 0);
   int len = env->GetArrayLength(buffer);
   try {
      pm.ParseFromArray(reinterpret_cast(bufferElems),
         len);
      // handle message here
   } catch (...) {}
   env->ReleaseByteArrayElements(buffer, bufferElems, JNI_ABORT);
  // This is not productive level code. In practice, rigorous error checking
  // is needed here per JNI best practice.
}

Performance

Conceptually, protobuf over JNI should be more expensive. After all, protobuf is first encoded in Java, deep copied in JNI, and then decoded in C++. In practice however, the performance of the protobuf-JNI approach is 7% faster than the POJO-JNI approach.

jni_perf

Pojo-JNI vs. Protobuf-JNI over 10 million JNI calls.

Thoughts

Protobuf is a good medium to pass complex data structure through JNI. Compare to the handcrafted reach-back JNI code, protobuf over JNI has far lower code complexity while having equal or better performance.

This approach is great for passing low volume traffic of complex data over JNI. For high volume traffic, it is best to avoid complex data altogether and stay within primitive types.

This only covers synchronous JNI call. Asynchronous JNI callback is a topic (nightmare) for another day.

Source

Source files for the benchmark can be downloaded here.

Tools: Win7 64bit, Java7u10, VS2008, protobuf 2.4.1

Windows Wildcard Path Expansion

For the past few days, I’ve been working on a small Protobuf Compiler plugin. During the course of development, I was stuck on a trivial yet annoying problem – path expansion.

This trivial problem led me to a wild goose chase. From branch diff’ing to debugging, it took me several days to figure this out.

Long Story Short

Here’s a small program called wildcard_input.

#include

int main(int argc, char **argv)
{
	for(int i=0; i<argc; ++i)
	{
		std::cout << argv[i] << std::endl;
	}
	return 0;
}

Now I invoke the following command.

wildcard_input *

This is the output from Win7 and Ubuntu 12.4.

Running from Window 7

ubuntu_path

Running from Ubuntu 12.04

Apparently path expansion is performed through the shell by default under Linux, whereas it is left to the program to handle under Windows. I prefer the Linux behavior, but others might disagree.

Windows Path Expansion

To get the automatic path expansion behavior in Windows, you need to add a linker options/link setargv.obj in Visual Studio.

linker_option

With this option, wildcard paths are now expanded properly.

win_path_expanded

Same program, compiled with the new linker option /link setargv.obj


Retrospection

  1. Filed misleading bug to the Protobuf team.
  2. Diff’ed 4 different branches for code delta
  3. Hours of proto compiler debugging and Stackoverflow browsing.

… Alan